Tuesday, February 23, 2016

Crafty Bird Cage

Hello Folks!!! Today we are excited to make a crafty bird cage which you could either hang  in your balcony this summer or keep it indoors & enhance your home décor! This cage has a rustic look. The best part about this is that this is a low or a no maintenance bird cage as it only has a mock bling bird!


Things required:
Chipboard 2mm
Bronze Colour- Acrylic paint
Flower making wire
Flower Stem with pollen
Pollen bunch
Scissor
Bling Bird model
Handmade Paper Flowers
Flower making wire- Thick


To make Bird Cage-
Step 1: Mark a circle on the chipboard (depending on the size of cage you want to make) and cut along the line.
Step 2: Paint the chip board in bronze colour, punch eight holes on the chipboard.


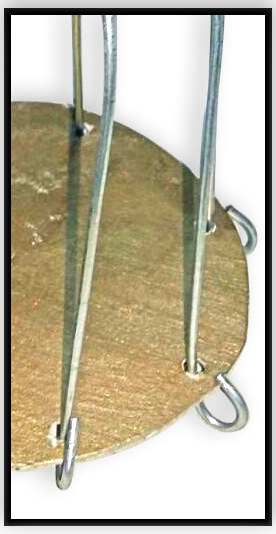
Step 3: Bend the wire at the centre to make U shape. Insert the U shaped wire to the opposite holes on the chipboard and twist it using a plier, to make a loop. You will need eight such ‘U’ shaped wires to complete the cage.


Step 4: Wind the flower making stem around the cage and on top of the cage to hold the cage together. Completed cage will look as shown. Paint the wire in bronze colour to give a vintage look.
Step 5: Place the bird in the cage 

Step6: Arrange and wind the ready pollens and flowers around the cage, as shown. Tie a thread or wire to the top of the bird cage, to hang it. 
Beautiful vintage Bird cage is ready to hang in your garden, room or balcony.


Link for supplies:


Tuesday, February 9, 2016

Antique Decoupage Box

Hello All, Welcome to another tutorial. Today, we are going to make an exquisite antique decoupage box for the Valentine's Day. This decoupaged box makes a perfect gift box for your loved ones.  It is easy to do with limited supplies. Decoupage involves applying paper cut-outs to the surface of any item and then applying coats of mod podge/decoupage glue to get the perfect look.


Materials Required: 
Decoupage Paper – Vintage Theme
Handmade Flowers - Color of your choice
Wooden Blank
Modelling Paste
Mod Podge Satin Glue
Pigment Ink Pad
Plastic Half Pearl- 8mm
Scissor
Paint brush
Any stencil


Method:

Step 1: Take an wooden blank and note the measurements of all sides. Take a decoupage paper and cut it as per the measurements 

Step 2: Cut the decoupage paper as shown to match the measurement of the box.

Step 3: Apply Modge Podge all over the wooden blank.

Step 4: Place the cut decoupage paper on the wooden blank and cover it 

neatly
Step 5: Using Pigment ink, shade the box edges to add an

antique finish.
Step 5: Paint the entire box with Modge Podge. This gives shine and 

strength to the decoupage paper.

Step 6: Take any stencil and modelling paste to paint over the box


Step 7: Place the stencil on the box and apply modelling paste liberally on 

it with the help of a paint brush

Step 8: The finished work will look like this
Step 9: Embellish the box with half pearls and flowers

Make this Valentine's Day extra special by making and gifting these boxes filled with goodies to your loved ones. They are sure to entice your loved ones <3 <3 Let us know what you thought if this blog. Happy Crafting.


Link to Supplies:

Decoupage Paper – Vintage Theme IBPP27188 - http://www.itsybitsy.in/store/decoupage/decoupage-paper/decoupage-paper-vintage-flower-w-leaves-a4-1sheet-ib   

Flowers -  http://www.itsybitsy.in/store/index.php?main_page=advanced_search_result&search_in_description=0&keyword=mulberry+rose

Wooden Blank - http://www.itsybitsy.in/store/decoupage-blank/mdf

Modelling Paste - MMAR23790  http://www.itsybitsy.in/store/index.php?main_page=advanced_search_result&search_in_description=0&keyword=23790 
Modge Podge Satin Glue - http://www.itsybitsy.in/store/index.php?main_page=advanced_search_result&search_in_description=0&keyword=Modge+Podge

Pigment Ink Pad - IBSP20564 http://www.itsybitsy.in/store/index.php?main_page=advanced_search_result&search_in_description=0&keyword=20564

Plastic Half Pearl- 8mm- IBSC62732 http://www.itsybitsy.in/store/index.php?main_page=advanced_search_result&search_in_description=0&keyword=62732


Tuesday, February 2, 2016

Red Heart

Hello All, welcome to Itsy Bitsy's tutorial. As the Valentine's day progresses, we are caught in the LOVE-mode. Today, we shall make a heart out of red tissue papers. You can make plenty of these and decorate your house or office or gift it to someone special in your life. It is an easy DIY. :-) :-)

Materials Required -
Chipboard 1mm
Tissue paper
Scissor
Elastic wire
Itsy Bitsy Craft Glue
Stick (Any)

Method
Step 1 – Take a red tissue paper and cut it into rectangular shapes
Step 2 – Make around 200 pieces
Step 3 – Take a tissue paper cut out and press the middle with the help of any stick


Step 4 - Apply glue in the middle, as shown
Step 5 – The finished look will be like this
Step 6 - Take an A4 size chipboard (1mm) and shape it like a heart (you can use scissor). Glue the elastic wire to the top of the heart with the help of Itsy Bitsy craft glue
Step 7 – Glue the tissue papers to the chipboard, as shown

The heart is ready. You can use it as wall hanging for your home décor. This can be a great gift for your loved ones on the eve of Valentine’s Day <3 <3

Link to supplies

Chipboard 1mm - IBPP12089
Tissue paper – IBPP14868
http://www.itsybitsy.in/store/craft/alpha/plain/paper-alpha-6inc-z-pastel-blue-1pc-ib
Itsy Bitsy Craft Glue -  IBAD13255