Saturday, May 31, 2014

A Vintage Bridal Album

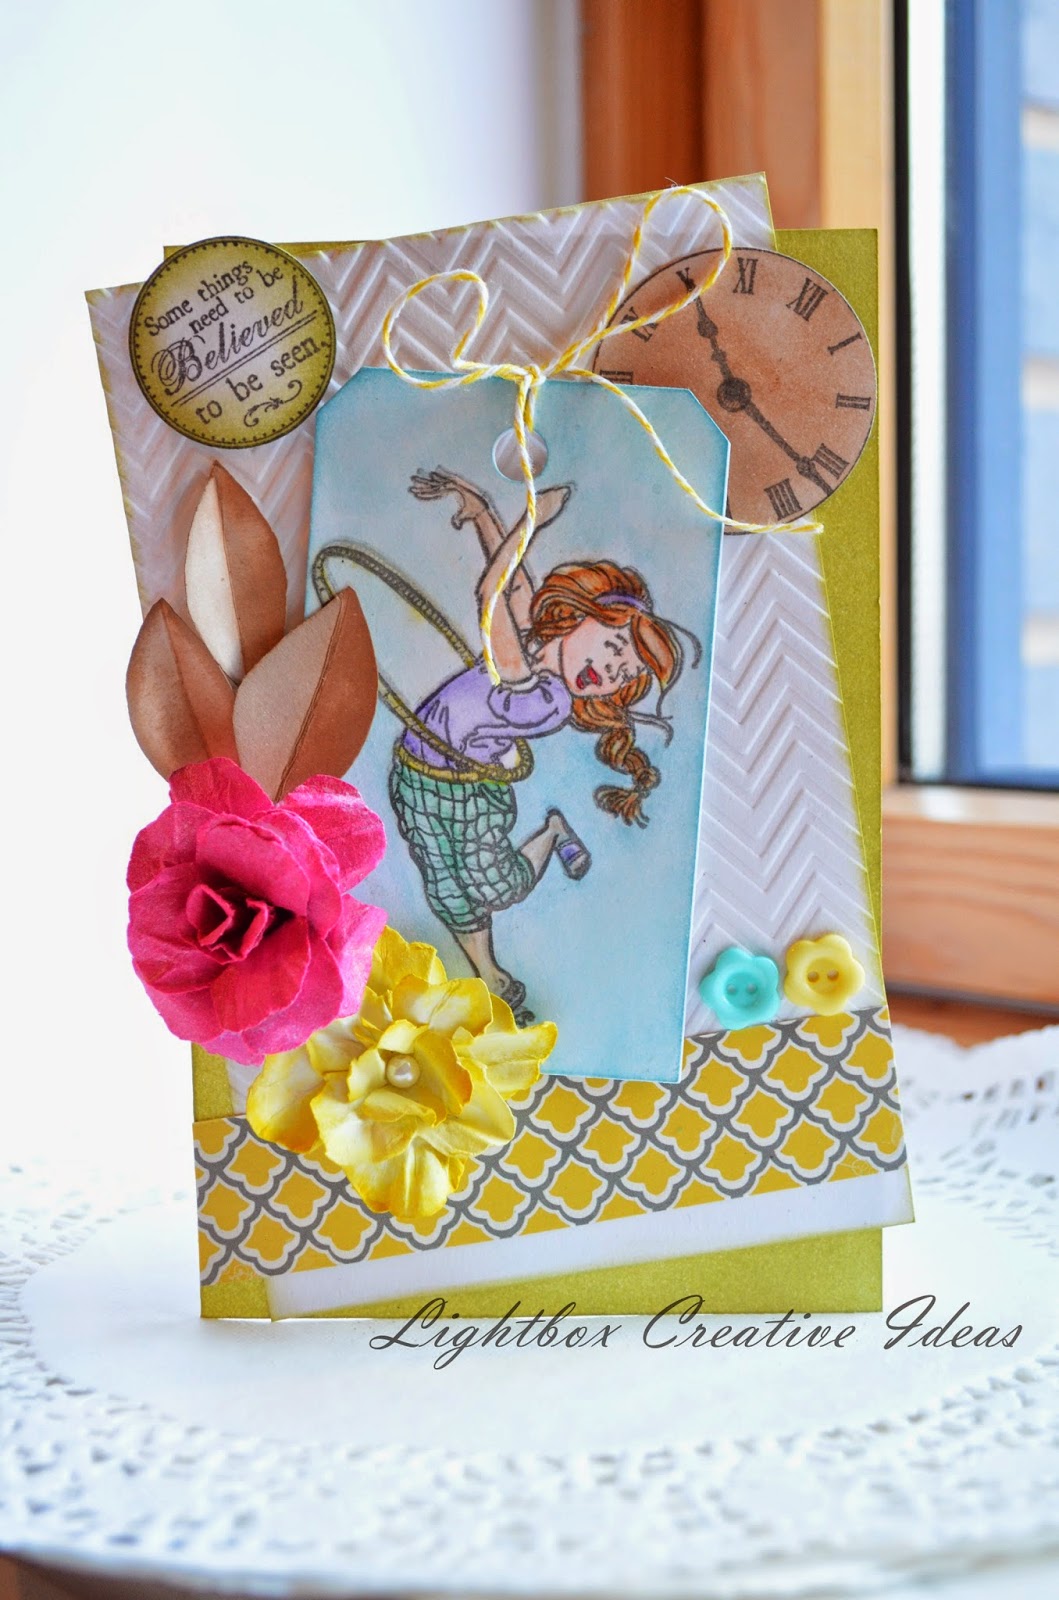
Off late I've found myself quite hooked on Mini Albums!! I guess all of us crafters go through these phases and clearly I'm no exception. Today I've got a new album to share with you - it's a vintage bridal album!


The album wasn't always a vintage bridal album... it was supposed to just be a vintage album. Then as I got crafting, I found myself adding roses, then more roses and even more - until finally it looked seriously bridal! Which is why I have re-christened it a Vintage Bridal album.


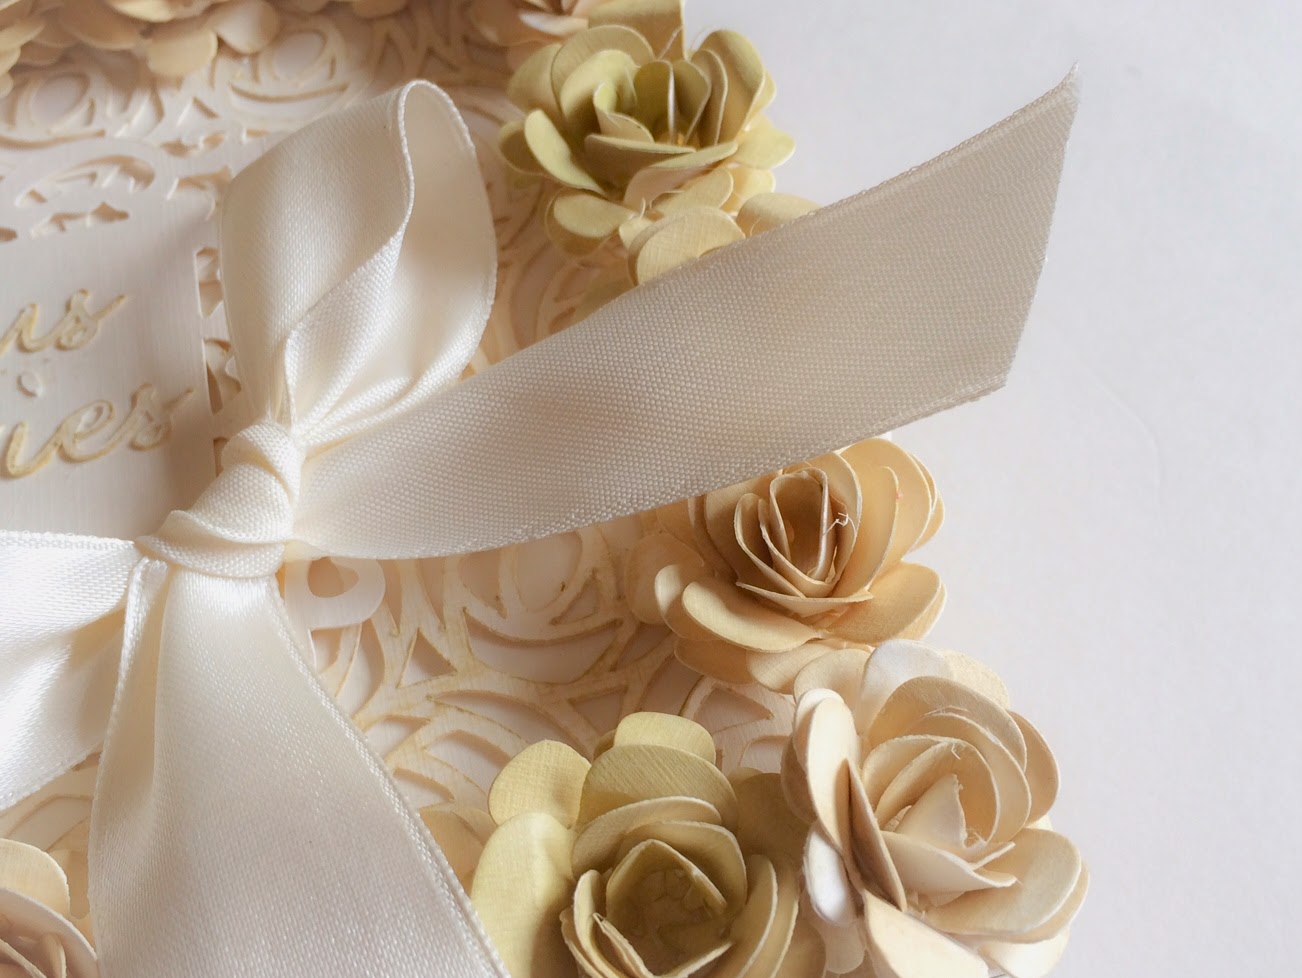
All the roses were made using the ItsyBitsy Swirly rose die. It's so easy to use and you can really make gorgeous roses with it. What is interesting about this project is that I used the same color of card stock for the entire cover. It was all a creamy white. I added the vintage feel only with Antique Linen Distress Ink. I inked the roses with it, then shaded the background design with it. Gradually with all the shading and  inking, I had 2 shades on the cover creating this fabulous aged look.

A pretty bow with cream ribbon finished off my project. And I think it looks pretty awesome! What do you think? Do let me know - would love to hear your thoughts.

Supplies Used:

Friday, May 30, 2014

TGIF with Pooja - Summer card

Hello lovely readers !
How are you doing today ? The summer is returning around here in UK and im feeling particularly happy about it ! Beacuse i love the heat after enduring all that horrible cold for almost half the year .
Anyway 
Welcome back to another TGIF post with me Pooja !
I am really excited to share this card with you all 

 I really love the way this one turned out !
The stamp I have used here is Little Darlings Go Girl Go
I absolutly adore this stamp set ! The happiness on the girls face shows it all ! 

For this card i tried a differnt placement of elements . 
I have never made one like this so i really love how this looks all finished !

I decided to make a tag first 

  • I first stamped my image on the tag with pigment ink .
  • Then i colored it with watercolors. 
  • Once done i distressed the whole tag with broken china distress ink .
  • And added a twine on top to finish the tag. 
The flowers here are handmade. 
I really enjoy making flowers sometimes when i get in the mood. 
I have used distress inks for the yellow one . 
Also do check out the lovely collection of blooms by itsy bitsy here


For the Background 
  • I first inked my whole cardstock green with distress inks 
  • I then used a sizzix embossing folder for the chevrons , I kept it white to draw focus to my stamped tag. 
  • Then i added a one inch strip of pattern paper in yellow beneath the embossing .There are a lot of beautiful paper packs and single 12 *12 design paper sheets available at Itsy Bitsy do check them out.
  • My white embossed cardstock is placed a bit tilted . 
  • I then embellished the card with some buttons , flowers and some stamped pieces . 
So that's about it ! 
I really hope you liked this card and this lovely image ! 
Its one of my favorites in the LD series !
For any questions or feedback please comment below !
thankyou for tuning in see u next month ! 

Wednesday, May 28, 2014

A Baby Girl Mini Album

I love doing baby projects, they're cute, fun and if it's a girl project - then so so pretty. The project I'm sharing today is a baby pink mini album. And here's a look at the cover.


I went to town with some of my favourite ItsyBitsy Dies for this project. The wonderful frame is from the Spellbinders Captivating Squares die - love love love that ornate touch. And the cute little girl outfit is cut using the Sizzix Girl Outfit die - Isn't it just ADORABLE!! The title text is cut from the Sizzix Doodle with Dazzle Die. I cut off the dazzle and just kept the doodle! Does that make sense? Ha ha!


Here's a closer look at the little girl outfit. The die provides for different cuts for the top and bottom  so that you can mix and match the little girls clothes. I went with papers from the DCWV Blossom Song stack for this central feature - the lovely rich pinks worked wonders for my theme. 


To finish off I had to add some flowers and pearls to the mix - after all which baby girl album would be complete without them! The gorgeous blooms from ItsyBitsy were perfect to adorn the corners - and voila my album was ready!

What do you think of my Baby Girl Mini? Leave a comment and let me know! 

Supplies Used:

Tuesday, May 27, 2014

Butterfly Cupcake Toppers


Butterflies is a very popular theme for little girl birthday parties. It's sweet, it's pretty and so girly. I was recently asked to do a few toppers for a butterfly party and I figured what better way to do it than with the Sizzix Bigz Butterfly Die.


This die is awesome because it comes with the butterfly shape as well as all the elements inside it like the wing decoration, the body and the antennae. You can add them in different ways to decorate your butterfly. The other thing I love about this die is that it's large enough to be a cupcake topper. It's not a mini size, rather a bold large size - certain to make a statement in any party.


To decorate my butterfly I used papers from the DCWV Sweet stack combined with pink card stock. I also used some pearls to highlight the body and a flat backed pearl for the head.

I love these fun girly toppers and thanks to the Sizzix Butterfly die, it took me just about 30 minutes to do them all.

Thanks for dropping by!

Supplies Used:

Sunday, May 25, 2014

A Wedding Explosion Box

I love making explosion boxes!!! They are so unique and fun - a great way to make a card into a gift and vice versa. I recently did a wedding themed explosion box which provides space to record details about a couple's relationship - almost like a scrapbook in a box!


Here is a view of the box when it's closed - in addition to the lovely bow for lid, I also created this massive rose using some pink punch paper from ItsyBitsy. Nothing says love and weddings like roses and I wanted this one to be really grand and lavish.


When the lid is removed, the sides of the box fall back to reveal a giant card filled with spaces to record different details of relationship. The topics include 'How we Met', 'Our Families', 'Our First Photo', 'Our  Engagement', Our Firsts and 'Our Wedding. I also provided 2 tags for the couple to write notes to each other. All the headings are cut from a Spellbinders office supplies die - great for projects like this. 


The central feature of the explosion box is this gorgeous 3D tiered cake. I decorated each tier with the Spellbinders Banner Basics Die and added a rim of pearls as well to make it truly bridal. For the top, I made a rose using the ItsyBitsy Swirly Rose Die on top of a pretty bow of soft pink ribbon. 


The final feature of this project was the secret compartment hidden in the base of the cake to add a small gift like a note, cash, a gift card or even jewellery. Isn't that fun! 

How do you like my Wedding Explosion Box - would love to hear your views!! 

Supplies Used:

Friday, May 23, 2014

TGIF with Pooja - Creative Wrap

Hello my dear friends !
Welcome back to another LD stamping post by me ,  Pooja.
Today I have gift wrapping solution for you!


Ok what you see is a regular brown paper bag that we use here for packing perishables.
I was taking some baked cookies for a friend who was having a baby shower.(I did take other gifts along , :P )
So I decided to give this boring brown bag a makeover!
Here is what I did
·         I basically took a card stock in white, cut it into a rectangular piece to fit on top of the bag.
·         Then I dived into my scrap basket to look for scraps I have hoarded for a while.
·         I took out about 4 pieces of pattern paper that fit on top of my cardstock, I made sure that they are perfectly aligned
·         Glued them on the cardstock.
·         Next I tied a ribbon all across the piece into a neat bow.
·         Then I used a spellbinders die cut, and added another circle die cut on top of it. 
·         Over which I glued my fussy cut and coloured image.
·         And last but not the least I added the sentiment, which is also a die cut made with a sizzix die.

 Here is a closer look at the image .
The stamp I have used here is Little darlings flowers for you
I have used alcohol markers for the skin and the hair.
You can find a great collection of alcohol markers here.

I coloured the clothes with watercolour this time.
I really love the fact that we can colour the eyes in this stamp J there are so many possibilities!

I think the flower bouquet here looks like a cupcake bouquet, so I used it to make it my gift wrap image since I was giving away baked goodies. 
And with this final look of the bag which I have covered with tulle on the top,
With that I am signing off today!
Thank you so much for reading and I can’t wait to hear your thoughts.!!

Supplies :


Tuesday, May 20, 2014

Summer Kids Craft with ItsyBitsy Craft Kits

The summer is winding down with just a few more weeks left to entertain the kids. I spent my summer afternoons crafting with my little ones and with the ItsyBitsy DIY Kits, craft time was a breeze! To see another project I made using an ItsyBitsy Kit, click here.


This craft session we decided to make finger puppets. The kit was so awesome, it had everything we needed to make 4 little puppets, all in different colours and themes. The ribbon sewing element was also great because it allowed my son the opportunity to work with his hands and coordinate the ins-and-outs of stitching.


As usual everything was pre-cut and packed in little pouches so that the craft session was organised and hassle free. I just needed glue and that's one thing we have a lot of here at Casa Koshy!


Have you been crafting with your kids? Would love to see what you created. Leave a link to your post and I'll be sure to pop by. To have a look at the massive range of Do It Yourself Craft Kits, click here. You're sure to find one that works for you!

Have fun folks!

Friday, May 16, 2014

TGIF with Pooja -

Hello my dear friends !!!
Its Friday again ! Welcome back to another post with me Pooja !
I’m so pleased to bring you this gorgeous and exclusive card made from the lovely little darling stamps available at the Itsy Bitsy store.

This time I created an inverted accordion fold card!
It’s inverted because I folded it the other way around.
So let’s take a closer look at the card. 

This is how the card looks upfront when its tied with a bow on the side


 Here is a closer look at the image. I have used watercolour pencils for the clothes & the hair, and the skin in coloured with alcohol markers. The stamp used here is Little Darlings Sweet Daisies.
I personally like this stamp J it’s got a lot of intricate details that I love.
I think these would go very well with watercolours too. Just remember to use a thin brush.
This time I have not blended the colour pencils with water, just for variety. 

 This is my flower arrangement. I went for this bright and lovely flower from the Antique fusion flower party collection. I find it absolutely breath-taking!
This is how the inside layers look. I have used different pattern papers for creating layers.
With that I have used doilies and punched out lace.
The butterfly is stamped and hand coloured with colour pencils.
The pink flat flowers used here are from the Jewel and pearl daises collection.


I think its important for a crafter to try new things. There was a time when I was afraid to do any new folds, thinking I would waste my supplies and papers. But then, unless you try you will never succeed!
So that’s about it from me this time J
Hope that you liked my card and will be trying your hands on,
Stamping and creating new folds soon!
waiting to hear your thoughts !

Hugs!

Supplies : 


Thursday, May 15, 2014

The ItsyBitsy Anything But a Card Challenge

It's the 15th of the month and time for a brand new challenge here at ItsyBitsy. This time the theme is 'Anything But a Card. We want to see what you can come up as long as it is not a card. You can really go to town on this one and we are eager to see your creativity!


To inspire you along the way I created this paper birdhouse. It is intended for a baby shower where the theme is 'Feathering the Nest'. This will be part of the decoration. The template for the birdhouse is really straightforward, you can find loads of them online and they're very easy to assemble. The fun part is the embellishment. I decided to incorporate the Sizzix Brick Wall Die all over the front, side and back facade of the house. I added some detail to the roof using my rotary cutter and for the little hole in the centre, I used a circle die with a scallop circle die. I think the cutest thing about this project is the hay inside the birdhouse - ItsyBitsy actually has craft hay and that worked WONDERFULLY for my project!

Rules of the challenge:
  1. Your entry can be anything hand made as long as it is not a card.
  2. Entries can be submitted until 10th June 2014.
  3. Entries will be open to audience vote from 11th to 14th June 2014
  4. Following this, the top 3 and finalists will be selected after combining both audience feedback and judges feedback.
  5. In order to submit your entry, click on the inlinkz button provided at the end of this post, add your image and link to your blog post containing the submission. There is a single category for all types of hand made creations.
  6. If you do not have a blog, please create an album on any online photo gallery like Facebook, Picasa etc, ensure the settings are public and link it up as detailed in point 5. 
  7. Each participant can submit a maximum of 3 entries.
  8. Submitting old projects is not permitted. All submissions have to be created after 15th May 2014
  9. In your blog post, create a link back to this page - The ItsyBitsy Anything But a Card Challenge.
  10. Entries are welcome from all over the world however if you are one of the top 3, we can only ship your prize to an Indian address.
  11. We will select the top 3 entries all of whom will receive vouchers worth Rs. 500 redeemable online at www.itsybitsy.in.
  12. In addition 6 finalists  will be selected all of whom will receive a badge to display on their blog.
Well that just about wraps up this post! Looking forward to seeing your creations!! All the best folks!

Submissions for the Anything But a Card Challenge


Supplies Used for the BirdHouse